 Description
RealShear allows users of the PSX 747-400 simulator to experience, train and analyse wind shear encounter as induced by severe meteorological phenomena such as microbursts frequently associated with thunderstorms. These dangerous phenomena have lead to numerous airplane crashes and near misses throughout aviation history. Training for correct escape manoeuvres forms an integral part of type rating as well as multi crew training. Traditionally, this type of simulation is only available in simulators found in airline recurrent training facilities, aka the “big” simulators. In these simulators, the complete cockpit sits on on a hydraulic motion base to provide sensory feedback also to the inner ear (balance, perception of acceleration). Behind the cockpit is an instructor station which has a few screens that allow the instructor to simulate failures, set weather conditions, traffic, and also to induce windshear events at critical phases of flight. RealShear emulates this functionality of the big simulators, allowing you to trigger windshears of arbitrary severity during critical phases of flight which are defined (just like in the big simulators) by radio altitude and relative to performance critical speeds of the aircraft such as Vr. Also just like the big simulators, the software incorporates the actual data encountered by several historical shear events, some of which have resulted in major accidents. The data has been painstakingly translated into PSX windshear injections to provide as realistic a scenario as possible. At present, there are 4 historical scenarios based on flight data recorder evaluations built in:
- Delta Air Lines flight 191 at DFW, and from the same incident,
- American Airlines 539,
- The takeoff accident of Pan American 759 in New Orleans,
- The takeoff incident of Continental Airlines 63 at Tucson,
- The landing accident of US Air 1019 at Charlotte.
More scenarios are currently being encoded and tested to be included in future releases of RealShear. The free demonstration version will run for 10 minutes and should allow for plenty of evaluation time before you will discover that this is a purchase well worth your (much appreciated) funds! Note that the historical shear events are not available in the free demo, but the 14 other and customisable scenarios are all available for you to test.
Download links
This plugin requires PSX 10.0.5 beta 9 or later. Make sure you download the correct version from the following links. If you are running this on the same computer as PSX, then you will have the correct Java Runtime Environment (JRE) installed already and you can download the smaller setup program. If you do not have the JRE 1.7 or higher installed, or you don’t know, or you get an error running the smaller install saying no compatible JRE was found, and you don’t wish to install one from the web browser it opens for you automatically, you can select the “Standalone” download for Windows or OS X, which runs from a single executable. This does not install any runtime clutter in your system, it’s completely self contained (and thus will not be broken by other applications updating/upgrading/reinstalling/uninstalling your local JRE) – at the expense of just a few MB of disk space.
Download for Windows (6MB)| Download for Windows Standalone (~50MB)|Download for Mac (6MB) | Download for Mac Standalone (~50MB) | Download for Linux (3MB)
Licenses
There are four levels of licenses. Please read carefully which license is appropriate for you before purchasing your license. The standard, patron, and commercial editions are functionally identical, however, they differ in what scenarios you are allowed to use them in. Please note that there is no upgrade path!
The license includes free upgrades both major and minor for the duration of the license validity which typically is 1 year from the date of purchase. This license is not valid for commercial use! Commercial use includes use at a simulator facility that is for rent/hire or for use at an airline training facility, or for any commercial training courses you or the organiser of the course are receiving financial benefit from. Note that when the software is run at one of those facilities, a commercial license is required regardless of whether you are actually using this software during training sessions.
| This is the free license. There is no cost associated with this, however, it is missing the historical windshear events. You can use this as an extended demonstration version. To purchase one of the paying licenses, simply come back to the site and select one of the links below. | 12 month license (all platforms) FREE Click here to obtain your license code |
| This is the standard license. The cost per month is 83 cents. I don’t know any place where you can even get a coffee for that little. Let alone a professional level flight simulator add-on! | 12 month license (all platforms) USD $9.99 |
| This is the patron license. Select this license if you feel that $4.16 a month is a fair price for the hundreds of hours of effort that have gone (and will continue to go) into this project – considering how few of these licenses sell. You will see “Patron Edition” in the task bar, reminding you of your generous nature every time you run the software. | 12 month license (all platforms) USD $49.99 |
| The commercial edition allows full commercial use as well as private use of the software. | 12 month license (all platforms) USD $199.99 |
Your license is automatically generated and emailed to you on checkout. Please check your spam folder if you are not receiving your license within 5 minutes of placing the order. If you have not received your license in your spam folder or your inbox, please send an email to billing@inside.net indicating your name and email address you purchased the license under.
A Typical Use Case
You would start out by briefing yourself (or with your crew) what training scenarios you will be running. In this example we’re going to look at a non-predictive shear that triggers as the aircraft descends through 1200ft on the radio altimeter. The goal is to lose as little altitude as possible and to conduct a safe go around.
After starting PSX, you start RealShear. The software remembers where your windows were placed, it also remembers to connect to PSX on startup. Open the task panel for “Non Predictive Windshear on Landing” and click the “Load” button to the right of the first button in that task pane. You will notice that PSX automatically repositions itself to a position about 6NM on the ILS for RWY 28R at KSFO and remains in motion freeze mode. At the bottom of the RealShear GUI, click the “Show Analysis Window” button in the “Status and Analysis” task pane. Position the windows in such a way that they provide easy access between each other. Of course all of this is best run on separate computers for maximum effect. Your screen will look something like this:
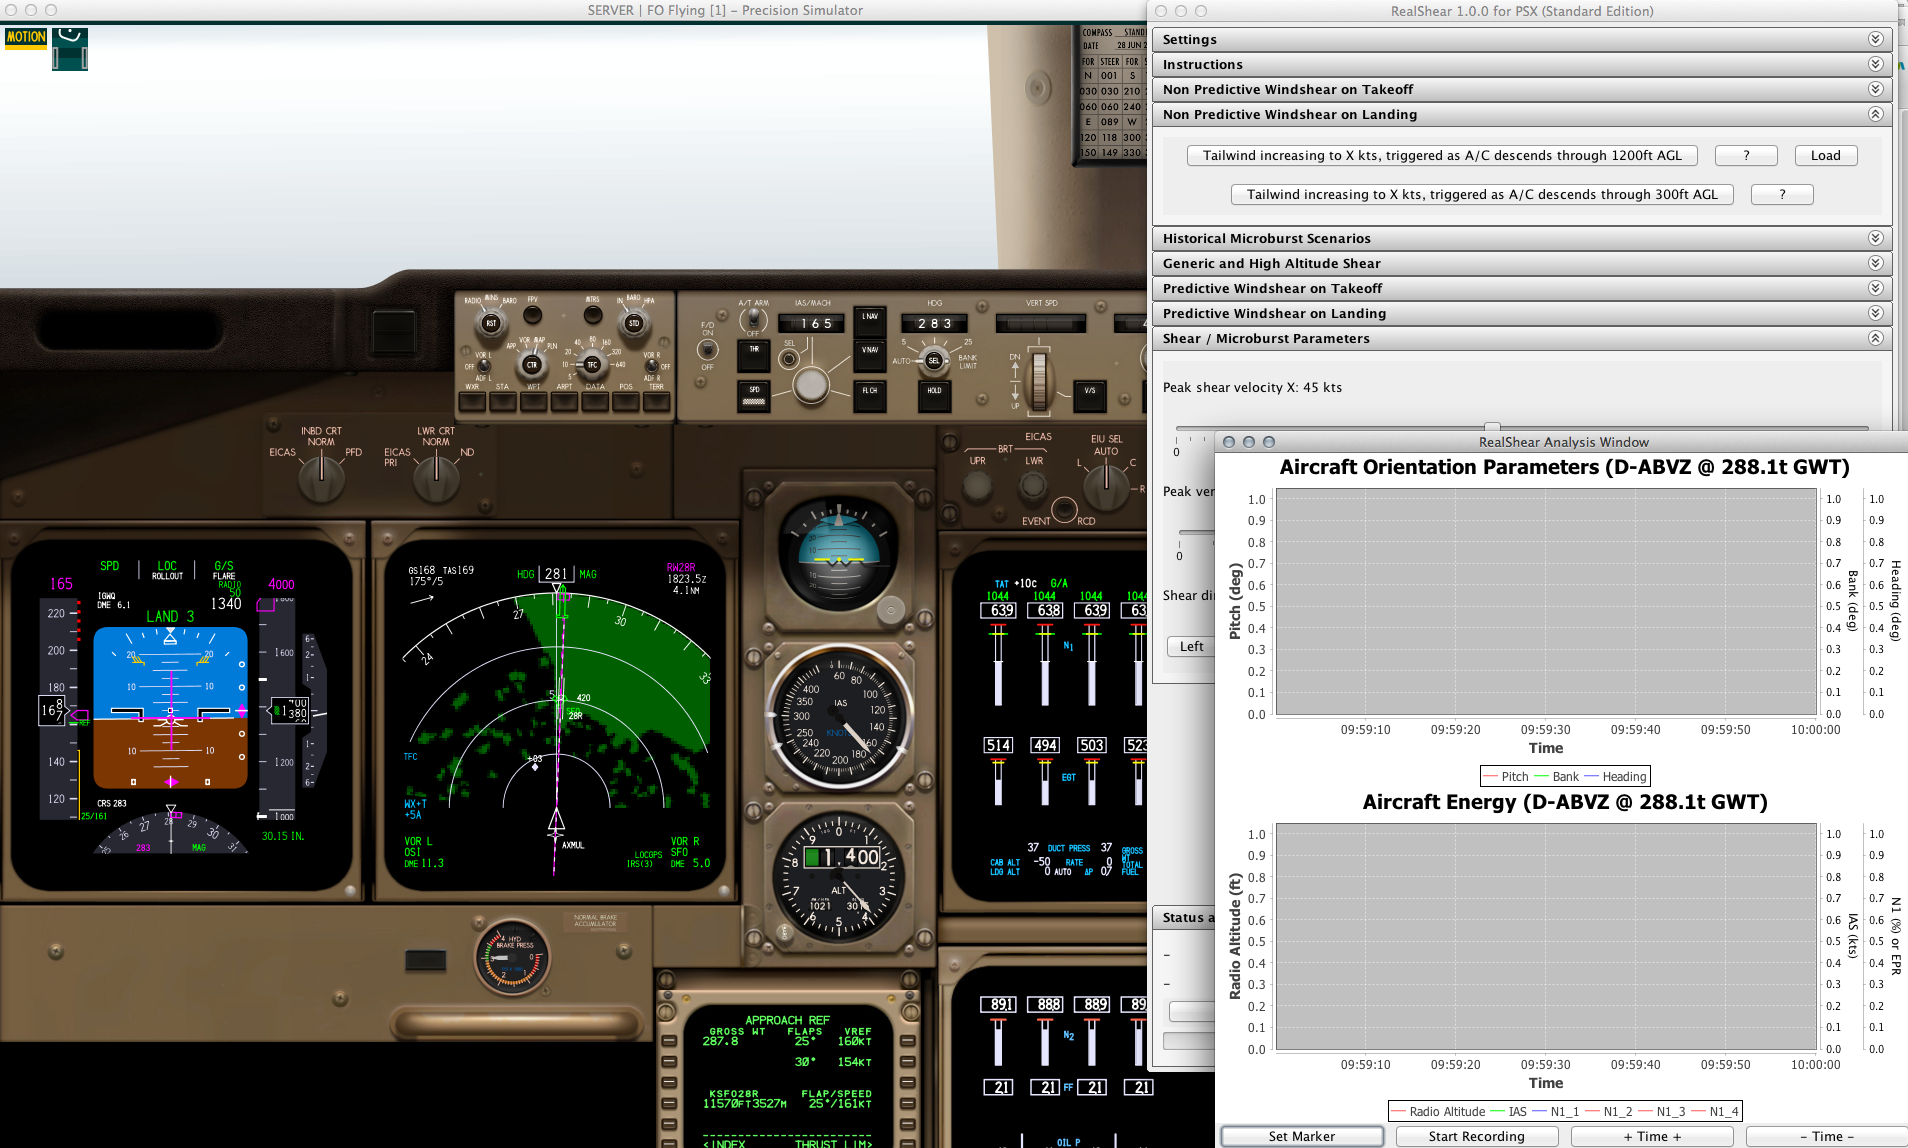
An example layout if only one screen is available.
We then want to set up the shear and vertical magnitudes. Open the “Shear / Microburst Parameters” panel and use the sliders to adjust the lateral shear (in windshear analysis circles we call that direction X) and the vertical shear (which we call Z). For this example we’re going to set X to 50kts and Z to about 2500fpm. Once these parameters are set, all that is left to do is to tell RealShear to go ahead and trigger the event and then unfreeze the PSX motion! So go ahead, click on the “Tailwind increasing to X kts, triggered as A/C descends through 1200ft AGL” button (this arms the event), then switch to PSX and press ‘m’ to unfreeze the motion freeze. Then switch back to RealShear and bring the analysis window into the foreground. You can either start recording on your own (in which case you also have to stop it on your own), or you can let RealShear start/stop the recording for the duration of the event. Then sit back and watch (and be ready to press TO/GA).
After unfreezing the simulator, at the bottom of the screen you will now see the text “Waiting for activation criteria to be met: RA less than 1200”. This tells you when the windshear will activate. On the next line, the injection parameters are listed: If you want to change them now, you have to press “Abort this event” on the button that started it first, then change the values on the sliders, and then re-arm the event again.
We fly the event, and then pause for analysis:
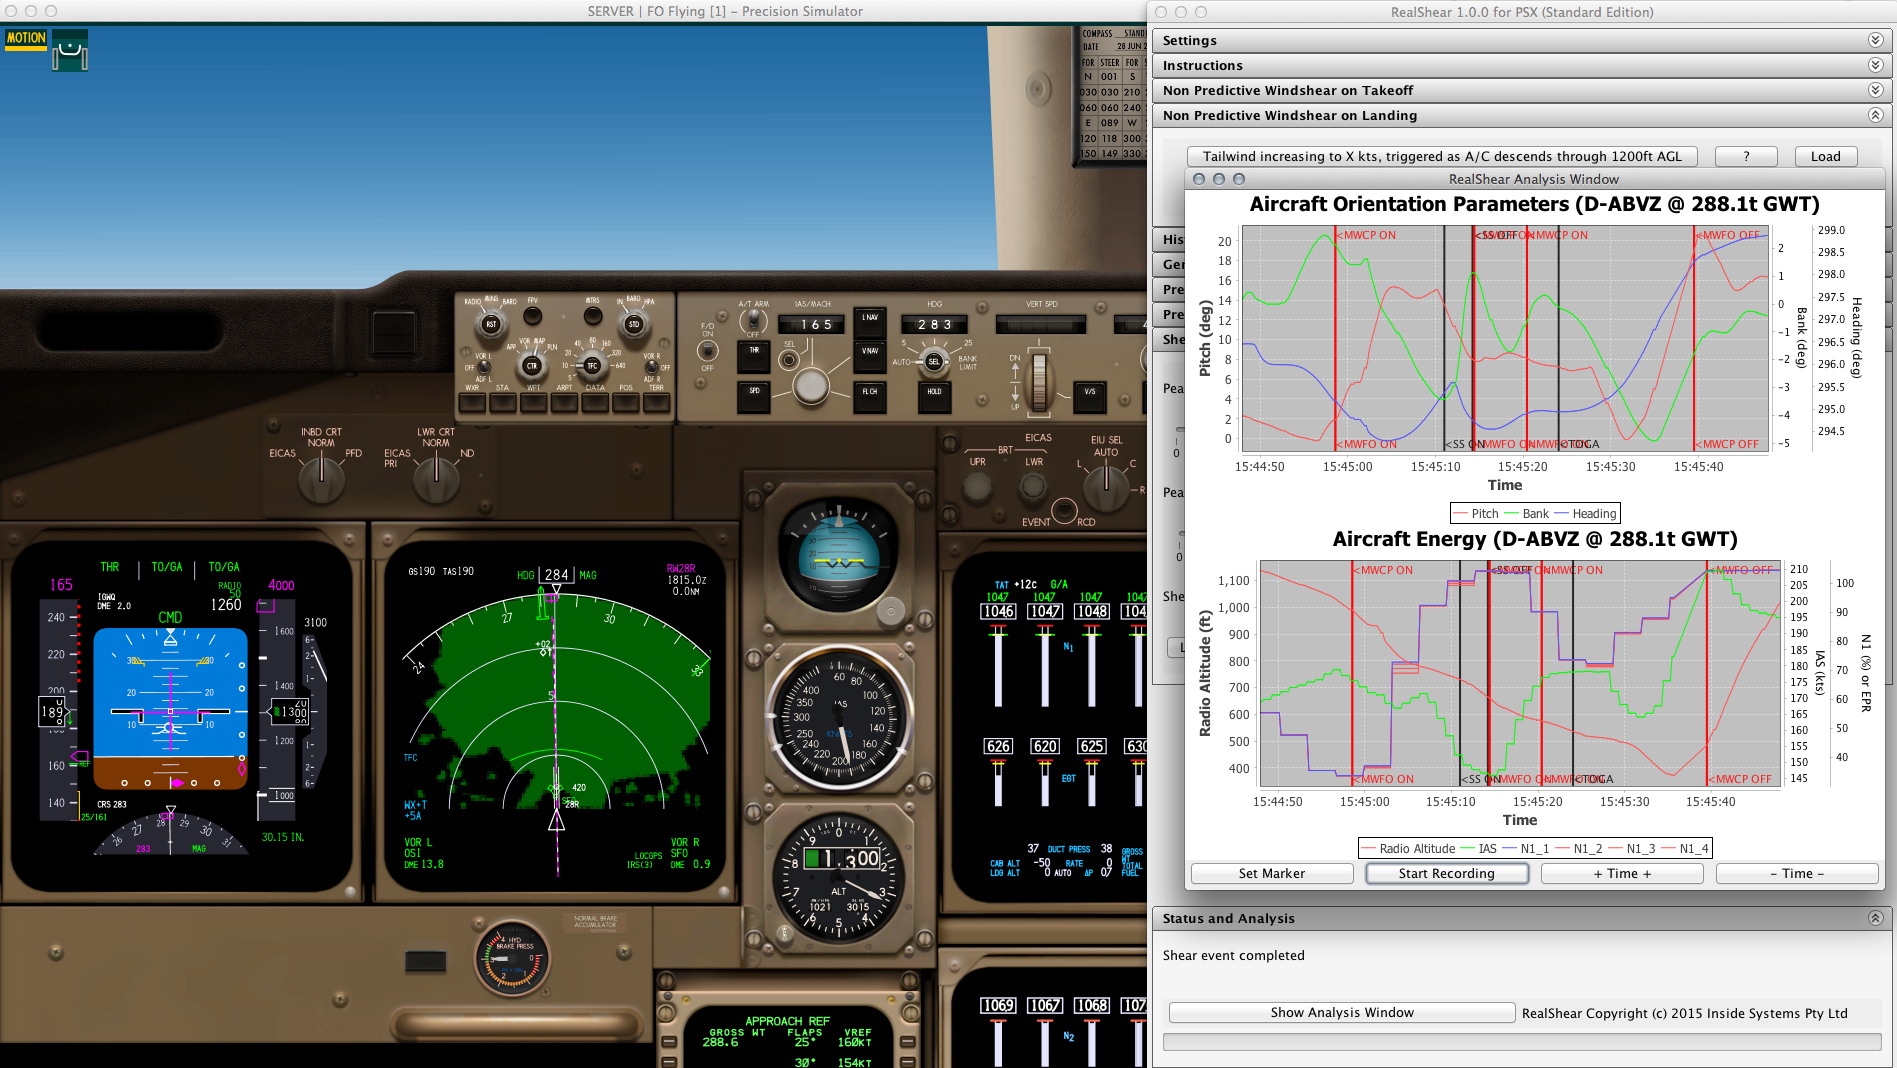
With the simulator frozen, we can look at the analysis plots in the RealShear window. We are shown two plots, one for the aircraft axis parameters and the other one showing all parameters that are important for managing aircraft energy.
The two panels in the analysis window show us the aircraft orientation parameters as well as the energy state. As you know by now from watching the AAMP videos, surviving a severe windshear is all about kinetic energy management, and the lower plot very impressively demonstrates this. You can zoom/pan around in the plots using your mouse, right click brings up a context menu allowing you to save them as a PNG. Take a look at this detail plot:

The detail plot showing aircraft energy management during a shear encounter.
We have for the purpose of this demonstration intentionally not reacted quickly enough and let the kinetic energy state of the aircraft get low, so low in fact that at 15:45:11, the stick shaker activates, we’re at Clmax (or alpha max, the highest lift, but shortly before a stall!) and the indicated airspeed IAS (green) continues to decay. 4 seconds later, the stick shaker deactivates (because we have unloaded the wings by pushing the nose down, this can be seen in the following plot:
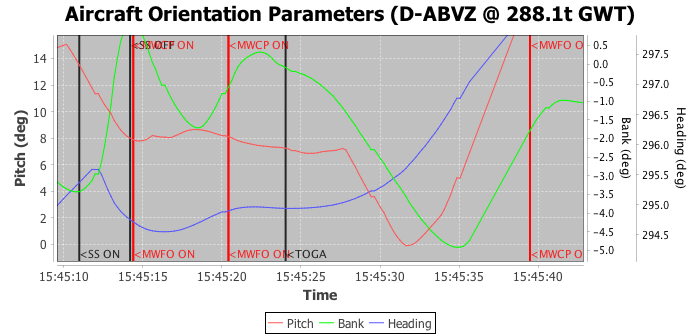
The aircraft orientation plot showing pitch, bank and heading.
We can see the same vertical lines indicating events on this plot as well. We can see that from 15:45:10, the nose has been lowered continuously so as the stick shaker has warned us about the impending stall, we’re already pushing the nose over so as to gain speed. Not shown on this plot, at 15:45:00, the Captain and FO Master Warnings have been triggered (due to the windshear alarm). At 15:45:14 another warning triggers and we let another 10 seconds elapse until we press the TOGA button. It’s important to see that from the moment we press TOGA, it takes another 150ft in altitude and 8 seconds of time until a positive rate of climb can be established. How would that have turned out if we pressed TOGA sooner? How would it turn out if we had a higher speed to begin with?
Using RealShear, you can examine an infinite number of possible scenarios for yourself. If you are a real world pilot, this will help with your understanding of kinetic energy management, and if you’re a playful amateur, you’re just going to have a lot of very interesting rides. Either way, we hope you enjoy this latest product!
Release history
1.0.4
– Update to support PSX 10.1
1.0.2
– Plot annotation labels vertical for improved legibility
– Fixed version check error
– Made Charlotte 1994 shear accident available in free version
– Added COA63 takeoff incident at Tucson
1.0.1
– Added support for a Free, Standard, Patron and Commercial license
1.0.0
– First public release